


0
Although all the blog hosting sites are a little bit different, they share many of the same features and all are fairly easy to figure out even if you are not especially experienced in creating web pages or blogs. WordPress is the most popular and provides the most tutorials and learning tools, so from this point on we will be focusing on using it as the site to create your blog.
If yousimply want to create content and not worry about selling ad space, then you can also use WordPress to host your site. There are a lot of benefits to this. First, it’s free. You can create as many blogs as you want and you are not limited in what you can write about. WordPress will publish and manage your blogs, handle your comments and even provide you with a vast array of in-depth analytics to help you track how often your blog is being visited, who is looking at it, and even where in the world they are located.
With a WordPress hosted blog, you can select any domain name you want as long as it is not already being used by another WordPress-hosted blogger. Your address will then include “WordPress” as the center part. For example, if you want to call your blog “Cooking with Tim” and that name is available, your URL will be www.CookingWithTim.wordpress.com.
The downside of letting WordPress host your blog for you is that it limits the amount of money you can make because you are not allowed to sell ad space, promote affiliate products or use other monetization techniques. In fact, WordPress will advertise on your blog page and you will not receive any of that revenue. That is the cost of using the site to host your blog.
Yet you can still use nearly all of WordPress’ free tools – including any of hundreds of free themes – to design and create your blog, then host it on a separate website that you own. Then you can do anything you want with it.
WordPress also includes thousands of plug-ins, mostly free, that you can use to customize your blog, enhance the features you offer, and make your blog as interactive as possible.
Because the ultimate objective of this guide is to show you how to create the best-looking, most popular blog you possibly can while still being able to make money from it, this is the option we will be exploring from here on out. If you simply want to create a WordPress hosted blog, providing content without worrying about monetization, don’t worry. Nearly all the steps are the same. You just don’t have to spend any money.
Registering Your Domain
A domain name is what your website is going to be called. Examples include Match.com, CBS.org, Amazon.com, and so on. If you are going to host your own site, the first thing you need to do is to buy a domain name. They are offered for sale by hundreds of sites. In most cases, you pay for the right to use that domain name for one or two years at a time. At the end of that period, you have the option of renewing your domain name.
You won’t be able to buy a domain name if somebody else is already using it. Contrary to what you might think, telling if the domain you choose is available isn’t as simple as typing it into your web browser and seeing if something comes up or not. If you get an error message, it may mean that the domain is in fact available, but it also could mean that the owner is working on the site and doesn't have it up yet, that the owner purchased the name for future use, or that the owner bought the name hoping to resell it at a profit. There are people who buy hundreds of domain names on a speculative basis, hoping to sell them at a profit.
If you have a name that you really like and somebody else is already using it, you can find out who has it at this site. They may be willing to transfer it to you if they are not using it, or you can offer to buy it.
If neither options work for you, there are a couple of other things you can do. The first it to use SnapNames to “back order” the particular domain name. As soon as the current owner’s rights to that name expire, it automatically will register that name to you. Or you can use ExpireFish, a site that will “fish” for the name you want then buy it when it expires. Both sites require you to pay more than you would normally pay if you were to purchase an available domain outright from a domain seller, however.
So you might just want to select another name that isn’t already being used. While the costs vary from site to site, you can expect to pay between $10 and $35 per year for the use of the domain name. While pricing varies and changes all the time, the top five domain registrars and their most current basic pricing for one year are:
Any of these sites will give you the option of selecting a suffix for your website. These include .com, .org, .net, .edu, etc. If the domain you want is already being used with a .com suffix, for example, you may be able to buy with a different suffix. Generally, however, you are better off selection a domain in which the .com suffix is still available. It usually costs a little more, but it’s worth it because that is the default suffix most people use when searching for websites.
Your domain name should be related to the topic of your blog. If you are writing about dog training, for example, you might choose something like “DoggieCanineCollege.com” (which is available as of the time of this writing). Although you can use up to 63 characters, the shorter it is the better off you will be because it will be easier for people to type and remember. Stay away from domain names with special characters like hyphens and underbars because they will make it harder for people to find them. Also avoid clever abbreviations such as Sk8rBoi.com or NRGSolutions.com because they may confuse your readers.
Setting Up Your Web Hosting
If you are creating a website – and your self-hosted blog will be its own website – then you need to host it somewhere on the web. Unless you own your own web server (which odds are you don’t), you will need to lease space on a server somewhere with a service that will provide your site with internet connectivity. There are many different companies to choose from and – like domain sellers – the prices vary greatly from place to place. In fact, many domain sellers will also host your site for you if you want, though you probably can find a better bargain by shopping around a little.
While there are many sites you can use to host your blog, we recommend OkTeck because it allows you to get web hosting for as little as $4.95. According to the website Lifehacker, the other most popular web hosting sites are:
Any of these hosting sites will host your blog or website. The costs vary, as do the options they offer. For example, some sites will simply host your page that you already built using WordPress or another blogging platform while others allow you to build your own website using their own site builder system.
To get the deal and options you need, visit as many hosting sites as you can and compare their costs and features. One of the most important factors to consider is the quality of customer service each site provides. If you experience “technical difficulties” with your blog page, you want the site that can resolve them as quickly and efficiently as possible. Beware the least expensive hosting sites because they tend to have the worst customer service. If you are blogging for profit, any down time is going to cost you money.
Another option is to ask other bloggers which hosting site they use and whether they are happy with them.
Installing the WordPress Platform
Signing up for WordPress is free and easy. Simply go to the home page and click on the “Get Started” button. This takes you to a registration page where you can set up an account and choose a name for your blog. WordPress will tell you right away if somebody is already using the name you select. If the name you want is available, you will be sent an email with a link that activates your WordPress account.

You are now ready to create your first blog. The page you will build it from is called the dashboard. This is where you determine what your blog is going to look like, which features you want to include on your blog page, and what tools you want to use to manage your blog.
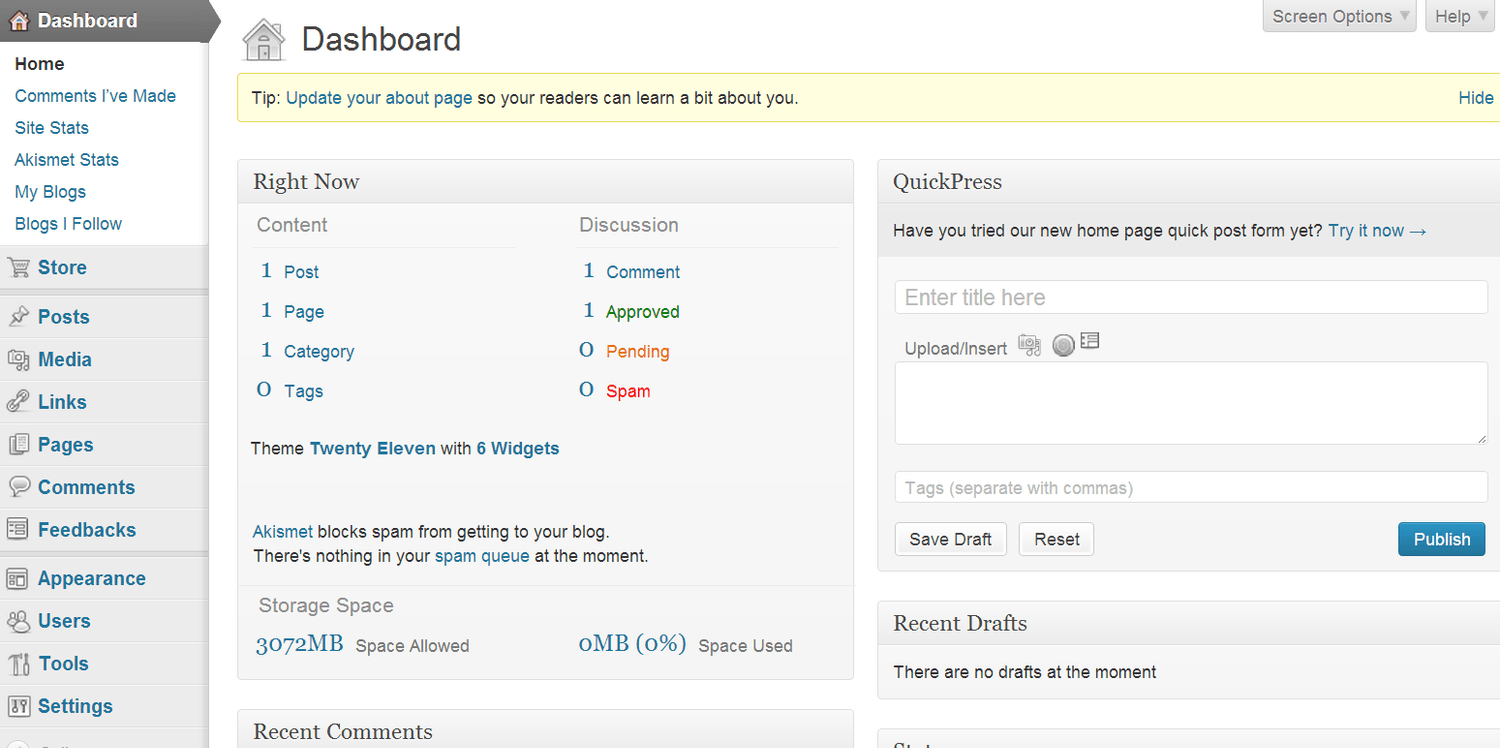
The buttons on the left are what you use to create your settings, make changes and add new features to your blog. You are going to want to learn how these work. Fortunately, each comes with a quick tutorial, mostly video, that tell you what each button does and how to use it.
The dashboard will be the command center for your blogs. It is where you will go to write new blog posts, manage comments, check the analytics on blog posts you already have posted, control the way your blog looks, and add new plug-ins. You also can use the dashboard to create entirely new blogs instantly.
Writing a new blog post is as simple as clicking on the “Posts” button on the left side of the dashboard, then selecting “Add New”. This will create a page where you can begin writing. There’s a box for your headline and another box underneath where you write the text for your blog post. There also are a bunch of icons for the different functions you can use, such as adding photos and videos, using bold and italics, adding bullet points, including links and so on.
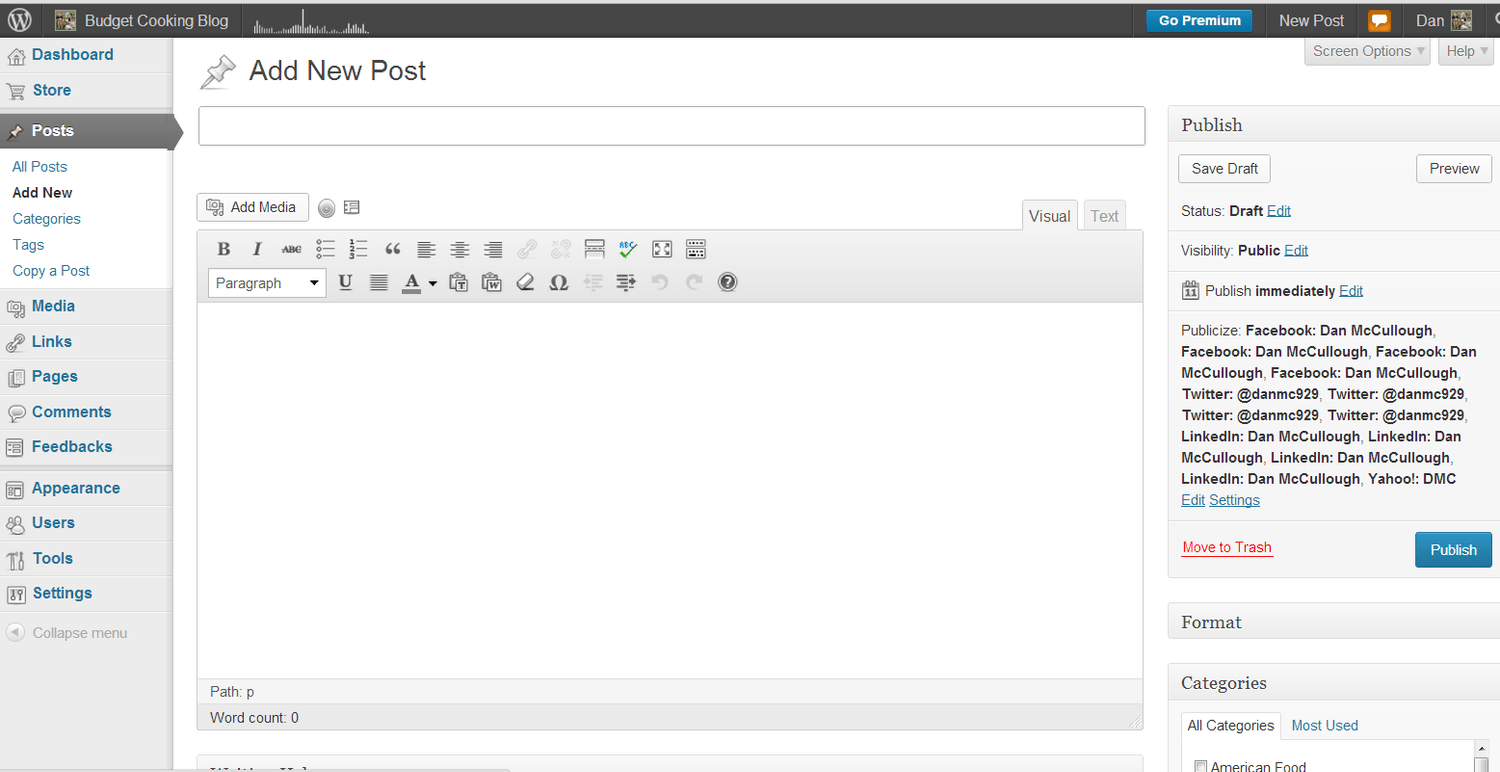
As you write, WordPress will automatically save versions periodically, or can click “Save Draft” button” at any time. If you want to see what your blog post is going to look like when you publish it, click on the “Preview” button. When you are finished writing your blog post, use the “Categories” and “Tags” in the right hand column to add keywords and categories that will make it easier for people to find your blog post online.
When you have completed writing your blog post and are satisfied with the way it looks, as soon as you click on the “Publish” button your blog post will be posted on the WordPress “Freshly Pressed” page and also sent to any subscribers you might have.
If you want to edit or change your blog post after it has been published, you can go in and make whatever modifications you want and save it. Then anybody who looks at your blog post from that point on will only see the corrected version. You also can delete any blog post whenever you want.
To install WordPress on your hosting site, simply install it using cPanel and through Fantastico. All you need to do is choose the WordPress option and install it and it will be loaded automatically.
Choosing Your Theme
Themes are pre-made templates that you can use to change the way you blog looks. WordPress offers thousands of free themes, with new free themes being offered every day. There also are paid themes that you can buy or you can opt to design your own theme if you prefer.
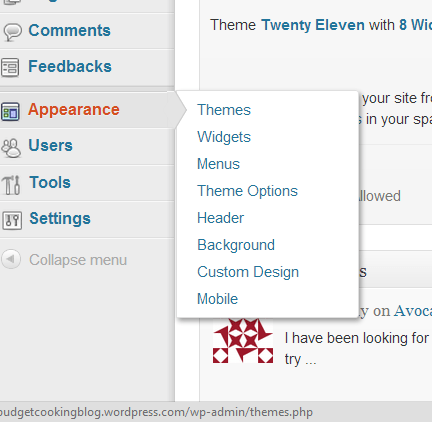
Selecting a pre-existing theme is simple. In the left column of your dashboard, click on the “Appearance” button then click on the “Themes” button from the dropdown menu. This will take you a page where you can search thousands of different themes for the one that is right for your blog. Most are free, but some you have to pay for.
You can search according to the most popular, the newest, the most commonly used, paid themes, and other categories. You also can change your theme anytime you want.
When you find a theme you like, if you want to see what your theme looks like, just click on the “Live Preview” button and a sample page will appear with content from our blog. If you like the way it looks, click on the “Activate” button and that theme will be applied to your blog. Anybody reading blogs you already have posted will see them in the new theme you have selected and any future blog posts also will be published using that them.
Using Plug-Ins and Widgets
Your theme accounts for much of your blog design, but you can also add an almost endless number of options to your web page to customize it. For example, you can add buttons that make it easy for readers to “Like” your posts, send these “likes” to Facebook, re-Tweet your blog on their Twitter feeds, add a +1 button on Google+, and all kinds of other things.
You can scroll through these options by clicking on the “Tools” button in the left column of your dashboard. You can add and remove these add-ons and widgets as often as you like. Most of them are free to use.
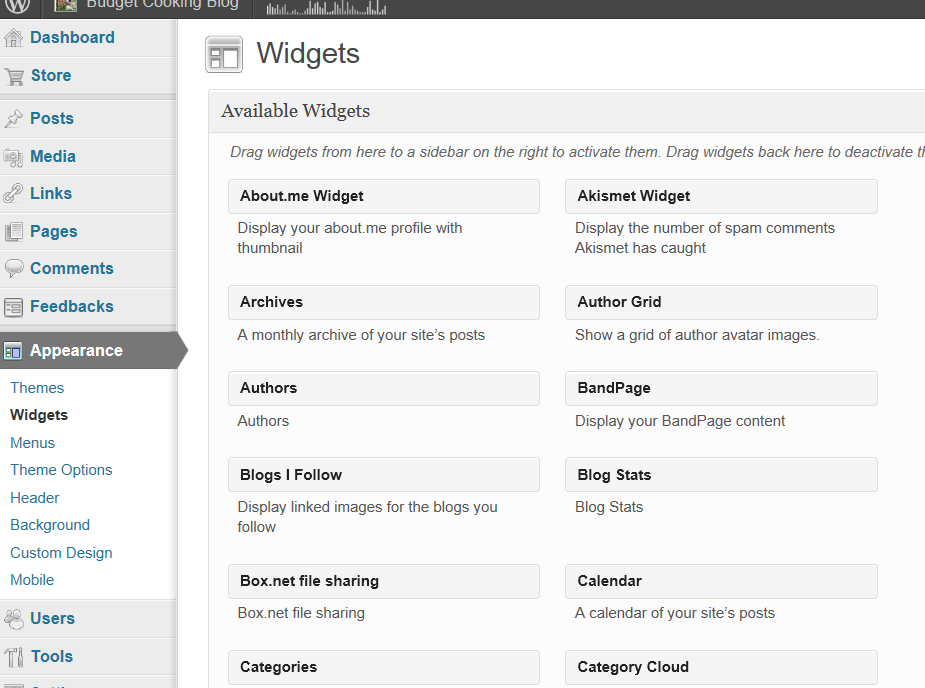
Widgets are free tools that can be dragged and dropped on to your blog page and include such things as customized archive menus, calendars, grids of author avatar images, calendars and a wide variety of other free tools. Scroll through the free widgets by holding your cursor over the “Appearance” button and then clicking on the “Widgets” button on the drop down menu.
While many of these tools can make your blog unique and encourage your readers to interact with your blog, too many can be distracting. So be careful not to overfill your blog page with a bunch of clutter that is going to distract from your content. A good idea is to look at other people’s blogs and pay attention to the widgets they use, then add only those you like and think are cool to your blog page.
Adding About, Contact Us and Other Pages to Your Blog
WordPress lets you write either posts or Pages. If you are just writing a regular blog entry, you write a post. These blog posts automatically appear in reverse chronological order on your blog's home page.
Pages are for content such as “About,” “Contact Us,” “Legal”, and so on. Pages exist outside of the normal blog chronology, and are often used to present timeless, or “evergreen” information about you or your blog site. Evergreen information is information that doesn’t change from day to day. You can use Pages to organize and manage any content.
In addition to the generally required “About” and “Contact” Pages, other examples of common pages include Copyright, Disclosure, Legal Information, Reprint Permissions, Company Information, and Accessibility Statement.
In general, Pages are very similar to Posts in that they both have Titles and Content and can use your WordPress Theme templates files to maintain a consistent look throughout your site.
To create a new page, simply hover your cursor over the Pages button on the left side of the dashboard, then click on the “Add New” on the drop down menu. This will create a template that you can use to create any page you want. You can include text, images, links, videos or whatever you want on your pages.
When you are finished creating your page, just save it and it will appear as part of your blog home page whenever anyone visits it. You can delete a page at any time by clicking on the “All Pages” button on the Pages drop down menu, checking the page you want to get rid of and then clicking on the delete button.
Everlasting Creators
Are you new to the digital marketing world? The expert? Somewhere in between? You're in the right place if you are looking for innovative ideas and want NO BS. Find out inside:
?The Most Valuable Free Tools
How To Use Social Media Properly
?Our Top Preferred Pick For Streaming
?How To Properly Live Stream
?Free Guides
?Free 365 Content Post
Simple Graphic Creation
?Quit Making Pretty Sites And Do This First
?No More Shiny Object Syndrome
?How To Change Your Mindset
You have been doing it all ? wrong, inside you will learn why and how to fix it. Our methods are so simple that your wife/husband will be ? mad at you for wasting all that ? money on crap ?. Keep an open mind, get quality content for FREE!!! Don’t make the mistakes everyone else makes.
We look forward to seeing you on the inside.


Connect with
Josh & Kristina


Business Info
Working Hard To Change Entrepreneurs Lives in A NO BS Internet Marketing Community
Follow Us


Created with © systeme.io
Privacy policy | Terms of use | Cookies